Zazzle Shop

Screen printing
Showing posts with label Pc Parts. Show all posts

Friday, September 30, 2011

Watch two floppy drives play Star Wars’ Imperial March

From: http://www.digitaltrends.com/
By: Andrew Couts

Darth_Vader

Floppy drives have made a musical return from the pages of history with the help of a Polish hobbyist and some open-source gadgetry in this super-dork rendition of Darth Vader's Imperial March.
Polish gadget hobbyist “Silent” has created what is quite possibly the nerdiest thing we’ve every encountered: the “Imperial March” – a.k.a. Darth Vader’s theme song – played by two floppy drives. That’s right, this obsolete technology has now returned as a musical instrument.

Now, some of you are probably asking, “What the heck is a floppy drive?” A floppy drive is what us geezers used back in olden times before CDs, DVDs, flash drives and the Internet became the standard technology for storing data externally. (Granted, CDs and DVDs are quickly on their way to obsolescence as well.) They only store 1.44 MB – yes, megabytes – of data, which now isn’t even enough to hold a single high-resolution photograph, let alone anything else. And, as you can see from the video below, the were extremely noisy.

Well, with the help of an open-source ATMega microcontroller board, Silent has managed to program two floppy drives to clatter away at the exact pitches necessary to send fear into the hearts of a Jedi. But how, exactly, does it work? Silent explains on his blog:

The sound comes from a magnetic head moved by stepper motor. To make a specific sound, head must be moved with appropriate frequency…

To move the head you need to activate the drive by pulling the DRVSB0 or 1 (depends on the cable you have and the connector – notice the crossover on the FDD ribbon cable) pin low and then falling edge on STEP pin makes the head move one step in direction dependent on DIR pin state.

An ATMega microcontroller is generating those frequencies and it makes the drives play music.

In plain English, that means the microcontroller is sending electrical frequencies to the drives in a specific pattern to make them recreated the desired tone.

However it works, this is awesome. Watch and listen below:

Monday, August 8, 2011

Can Your Media Center Make the Kessel Run?

From: http://furiousfanboys.com/

Now THIS is how you show off your geek pride, by making a custom-build media center PC out of a Millennium Falcon. And it looks like he put in some pretty nice hardware…SSD drive…good ram. Nice job!

Friday, June 10, 2011

Apple’s Spaceship Office Complex to Land in Cupertino

Cupertino City Council is likely to approve Apple's plans to build a new four-story spaceship-like HQ in the city, which would house around 12,000 staff. In response to Apple CEO Steve Jobs' presentation to the council, Cupertino Mayor Gilbert Wong said: "There is no chance that we're saying no [to Apple]. The Mothership has landed in Cupertino."

Apple’s Spaceship Office Complex to Land in Cupertino

Jobs on Tuesday unveiled plans to build a new campus near Apple's existing headquarters in Cupertino, in a circular shape that looks like a spaceship. The new space would be used to accommodate Apple's growing staff numbers. "Apple's grown like a weed and as you know, Apple's always been in Cupertino," Jobs said in his presentation. "The campus we'd like to build there is one building that holds 12,000 people."

Cupertino City Council reacted positively to Apple's plans for a new HQ. Wong said: "Every time that we have a large company that has a large sales tax produced we are very accommodating to that company."

Apple’s Spaceship Office Complex to Land in Cupertino

The four-story Apple mothership is expected to be completed in 2015, and would use self-generate energy, with the grid only used for backup power. In his presentation, Jobs empasized the green credentials of the upcoming campus, which will be built on land Apple originally bought from Hewlett-Packard while downsizing.

Parking at the Apple spaceship HQ will be underground, and 80 percent of the area currently used for parking will be landscaped, from currently 3700 trees to around 6000. A new research and development center will also be built, along with a new auditorium, so that Apple won't have to go to San Francisco for big k eynote events.

Follow Daniel Ionescu and Today @ PCWorld on Twitter

Wednesday, February 9, 2011

AT-AT Made From Recycled Computer Parts: Blue Screen of Hoth - only $450.00

From: http://technabob.com/

This awesome-looking AT-AT was created by Sage Werbock. He is an expert welder and blacksmith. Sage put this AT-AT together using scrap parts salvaged from old computers and some sheet metal. I have to say that the result looks pretty impressive.

star wars at at imperial walker computer parts
The main body is made out of power supply boxes. The head comes from floppy drive housings, and the legs and feet come from various pieces of scrap metal. A lot of love went into this sculpture. The whole thing was randomly “attacked” with the welding arc to simulate battle scars.
star wars at at imperial walker computer parts
This model is currently on sale on Etsy for $450, and there’s only one of these – so if you want it, you need to hurry to get it. It’s over a foot high and weighs about 15 pounds! Keep in mind this is no kid’s toy, as it’s loaded with sharp metal edges.
[Igeektrooper via Leetlady]

Friday, March 26, 2010

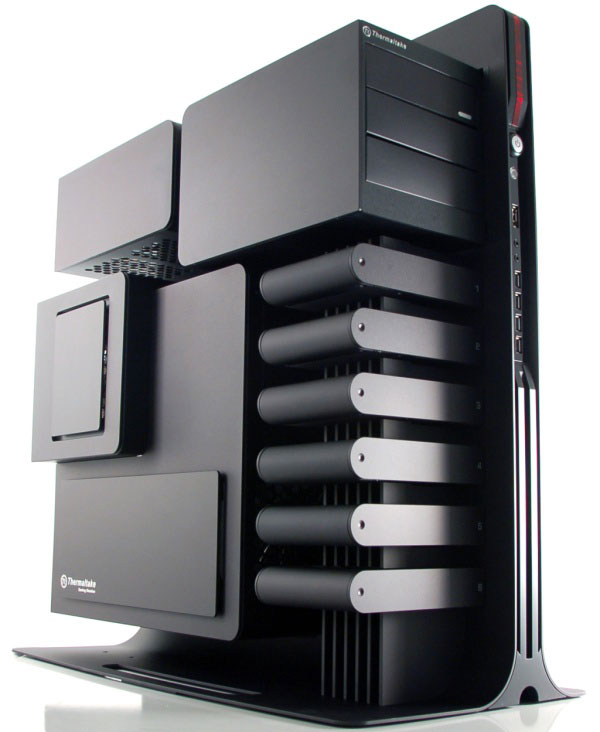
Close Up With The Coolest PC Case Ever, The Level 10

Computer cases tend to reveal certain things about their owners. With one glance, your friends can estimate just how serious (or casual) your computer hardware addiction may be. Whether the chassis is a generic, cream-colored throwback from the 90's, a standard mid-tower with a couple of LED fans, or an extravagant full-tower gaming behemoth with see-through side panels and custom graphics, first impressions unavoidably start with the enclosure.

Although the market is loaded with a myriad of attractive cases, one product from Thermaltake caught our attention from the moment we laid eyes on it and it has captivated us ever since. The Level 10 gaming tower is a new over-the-top enclosure made specifically for enthusiasts who want to make a statement without saying a word; or at the very least, appreciate cutting-edge design and absolute precision build quality. Of course, beauty is in the eye of the beholder, but few can deny the Level 10's eye-catching good looks and extraordinary construction. As you may have heard, this case was created by BMW Group Designworks USA for Thermaltake. The BMW Group designs new concepts for a variety of industries, such as yachts, trains, and aircraft. Let's check out its latest creation made specifically for gamers, to see if it's really as revolutionary and well-built as it looks...


Thermaltake Level 10 Enclosure
Specifications and Features

Model

Level 10

Type

ATX Full Tower

Color

Black

Material

Aluminum

Expansion

3 x External 5.25" Drive Bays
6 x Internal 3.5" or 2.5" Drive Bays
8 x Motherboard Expansion Slots

Front I/O Ports

4 x USB
1 x Audio
1 x eSATA

Cooling

2 x 60mm Drive Bay Fans
1 x 120mm Red LED Fan
1 x 140mm Red LED Fan

Physical Dimensions

24.17" x 12.52" x 26.22" (Length x Width x Height)

Weight

47.11 lbs

Warranty

3 Years Limited (parts / labor)

Price

$850


Click here for the full article and specs

Wednesday, November 18, 2009

Five Best Online Backup Tools


From: http://lifehacker.com/

Author of this post, at jason@lifehacker.com.

Local backup is a useful and necessary part of securing your data against catastrophe, but with the advent of broadband and inexpensive online storage, you've got little reason to not back up critical files to the cloud as well.

Photo by jared.

Earlier this week we asked you to share your favorite online backup solutions. Now we're back to share the five most popular solutions Lifehacker readers use to back up their data online and keep it secure in the event that some unforeseen event at their on-site location—fire, flood, theft, someone casts Chain Lighting in the server room—wipes out their local backup.

Note: When contenders in the Hive Five have a free option, we've listed that first, followed by the first level of paid backup they provide. For additional levels and packages click on the name of the backup service for more information.

For additional information on both both Hive Five contenders and other online backup solutions, you can check out this comprehensive comparison chart.

CrashPlan (Windows/Mac/Linux/Open Solaris, Basic [No online storage] Free, Premium [Unlimited] $4.50 per month)


CrashPlan takes an interesting approach with their backup software. You can download the software for free and use it to perform local backups on your computer and home network as well as back up data to a friend's computer if they are also running CrashPlan (so it's sort of off-site if a friend's running it). They don't offer any free introductory plans for online storage like most other online backup providers, but their rate for an unlimited personal account is on par with other providers. The software is very user friendly, and even if you're not sure if you want to commit to paying for an online backup service, it's worth a download just to automate your local backups. If your data goes kaput, you can restore it using the software or you can order a hard copy of your data.

Mozy (Windows/Mac, Basic [2GB] Free, Home Premium [Unlimited] $4.95 per month)

Mozy is an automated backup solution. Once you install the Mozy client on your computer, it will back up any files you specify at the frequency you specify. Mozy can back up files while they are open—so that huge presentation you've been working on for the last few hours will be backed up even if you're still working with it. Mozy also backs up based on file changes, only uploading the portion of a file that has changed and not the entire file all over again (meaning quicker incremental backups after the initial backup). Mozy stores previous versions of your files for easy restoration, and in addition to restoring all your files by downloading them, you can also order a backup on physical media for a fee.

Dropbox (Windows/Mac/Linux, Basic [2GB] Free, Pro [50GB] $9.99 per month)

Once you install Dropbox, a folder, appropriately called "My Dropbox", is placed in the Documents area of your computer. Anything you put into this folder will be synced with your Dropbox account. You can sync files, share files by making the folder they are in public, and restore a previous version of your file—Dropbox keeps a change log going back 30 days. All your files are also accessible via the Dropbox web site, which is great for those times you're at a computer where you don't have Dropbox installed, but you still want to access a document. If you want to sync a folder without putting it directly inside the main My Dropbox folder, you can do that with a little elbow grease, too. Dropbox doesn't have an unlimited option like the rest, but if all you want to back up is your most important documents, it certainly works as off-site backup, and it provides data redundancy on every computer you install it on.

Jungle Disk (Windows/Mac/Linux, Pricing: $2 per month + Per GB Fees)


Jungle Disk takes a different approach to backup on several different levels. Rather than offering a flat rate pricing for unlimited storage, Jungle Disk operates on a fee system. You pay $2 a month per account plus a fee per GB of data used. The fee structure per GB is currently: $0.15 for storage, $0.10 for upload, and $0.17 for download. On the upside, in the face of fee structure you can use your Jungle Disk as a networked disk drive in addition to a remote backup location. Jungle Disk is great at backup, but you can also use it with any application you'd like that can write to a network drive. A bonus for small-volume users is that for small amounts of data, you'll pay less than other backup solutions per month and have a lot more flexibility with how you use your remote storage.

Carbonite (Windows/Mac, Unlimited Storage $4.58 per month)

Carbonite is the other contender in this week's Hive Five that doesn't offer a free basic account with teaser storage. They have a simple pricing plan: $54.95 for a year of unlimited storage from a single computer. Like Mozy, Carbonite also offers block-level incremental backup to speed up the backup process. You can access your files through a web-based interface when you are away from home, and you can use the Carbonite application to restore all or some of your files at any time. Carbonite does not provide a hard copy of your data upon request, so get ready for some heavy downloading time if you've got a lot of data you need to restore.


Send an email to Jason Fitzpatrick,

Wednesday, November 11, 2009

How to turn an old PC into a media centre

http://www.techradar.com/
Play media on your TV with an old PC and XBMC


xbmc-weather-info

XMBX has a selection of add-ons you can customise to improve you media centre experience

<>

For years, Microsoft has been trying to convince us that we need to have not just a PC in the living room to serve up our media, but a full-blown installation of Windows too.

Both Intel and AMD have joined the fray – Intel with Viiv (the brand that no one knew how to pronounce), and AMD with its Live! initiative.

Despite all the marketing dollars spent on these ideas, they've been almost universally unpopular for a few simple reasons. First of all, most people don't want a modern high-powered PC, with all the noise they usually make, in the living room.

Much as we would like to, we won't be sidestepping this aspect in this tutorial; unfortunately, you'll still need a fairly decent PC.

Second, having a PC next to your TV or stereo means that you can't really use it as a standard PC. Trying to run standard applications on a TV screen will make you myopic in an instant, while watching movies on anything under a 24in widescreen monitor in your living room is a very unsatisfying experience.

Last but not least, the incredibly long boot times of your average Windows install make a mockery of any sort of instant-on concept.

XBMC – which was originally an app for the first-generation Xbox known as the Xbox Media Center – has become one of those annoying recursive acronyms so common in the world of software: it's now the XBMC Media Centre.

Despite the name, it's a very capable cross-platform, opensource application that will meet all of your media centre needs. Although it comes in versions for Linux, Windows, and OS X, we're going to look at the Live version.

It can be run from CD or installed onto your hard drive, and it is built around its own self contained operating system.

Get the software

1. First, head over to here and download the Live CD image. It will arrive as a ZIP file, so you'll need to extract it once it's been downloaded.

Step 1

Inside the ZIP file you'll find the ISO image, a Readme file and two other files. The file named 'installXBMC FromISO.sh' is a script file that can be used to install XBMC in a Linux environment, so unless you intend to do that, ignore it.

Use your standard disc-burning software to make a bootable image from the 'XBMCLive.iso' file and, once you're finished, plonk the disc in the drive of your old computer.

Run the Live CD

2. Before you do anything else, you'll need to change the BIOS settings of the PC that you are going to use as the media centre so that it boots from CD. To do this, press the appropriate key – such as [Del] or [F1] – when the computer starts to enter the BIOS settings, and then go to the Boot section.

Step 2

After you've made the appropriate changes, make sure you save them before exiting. When you restart, the PC should run the Live CD and show a Boot menu with various options, including choosing the GPU, running in Safe mode and an option to install to your hard drive.

For now, either select your GPU or allow the system to boot to the Live CD automatically. While running the Live CD enables you to get a feel for the application, any settings you change will be lost the next time you reboot, so you're best off installing to your hard drive once you're sure you like what you see.

Install XBMC

3. To install, reboot your machine and choose the last menu option, 'Install XBMCLive to disk (USB or HDD)'. Some older PCs don't support booting from USB devices, in which case you'll have to go with an internal drive.

Step 3

Be careful here: installation will completely wipe all information from your hard drive, so make sure it doesn't contain anything important before you proceed. Fixed disks must be larger than 5GB, while USB sticks need to have at least 1.5GB of usable capacity.

You'll need to designate the drive you are installing to. If it's a single fixed drive, this will be Drive 1. You'll also need to confirm that you want to install to a fixed disk rather than removable drive as well as entering a password. The install process takes about 10 minutes. After it's finished, remove the Live CD and reboot.

Access your media

4. Rather than a media centre – where your content is stored locally – XBMC is more of a 'media extender', in that it is designed to fetch media across a network from shared folders, NAS drives and other UPnP devices. You can use local folders, but this works best if you installed XBMC in Linux or Windows.

Step 4

If you didn't do this, you'll either need to set up a network share on another computer on the network or use a removable hard drive or DVD drive. To set a folder's source, click on the media category – say, for instance, 'Video'. Right-click on the 'Videos' link on the next screen and choose 'Edit Source'.

Click 'Browse' and have a look for the shared folder. If necessary, enter a username and password for protected shares. Once this is done you can either add a new shared location using the 'Add' source button, or move on to the next category.

When playing video, moving the mouse to the bottom-left corner of the screen will bring up a Playback menu. Press the [Esc] key to go back up the menu levels.

Add extra features

5. As well as playing back your media collection, XBMC can retrieve weather information, run scripts and be customised with different themes and skins.

Step 5

If you fancy being able to access forecasts, click 'Weather | Settings | Region' and change the region to 'UK' and the time zone to 'Britain'. You will now be able to enter your location in the Weather section and receive local weather forecasts.

Now go back to the main menu screen and click on 'Settings'. Here you can tweak the defaults for video, music and pictures, as well as editing things like your network settings and autoplay.

Clicking the power icon will bring up a new menu from which you can eject discs from the optical drive, shut down, reboot or enter Suspend mode. The only thing left to do is sit back, relax and enjoy the show.

-------------------------------------------------------------------------------------------------------

First published in PC Plus Issue 287

Monday, November 2, 2009

Computer Made From A Bottle of Ballantine Whisky

A good example of what we can do with an empty whisky bottle.

Made by Janos Marton with the desire of a “more quiet, small and low power consumptioning computer to function as a basic home server”, the Whisky PC has proved to be one of the most weird and interesting inventions.

01

03

04

05

06

08

09

10

Janos Marton explains how he made this strange computer here.

Thursday, April 2, 2009

The 6 Most Important Factors when Choosing a Power Supply |


Learn about how much power you need, single vs multiple rails along with the multiple rails marketing hype and much more.

read more | digg story

Monday, March 2, 2009

The Idiot’s Ultimate Guide To Building Your Own Computer

Mar. 1st, 2009 By Aibek

So you have decided to take the plunge and build your own computer? Well that’s good but there’s some problems attached to that plan. First you don’t know the difference between a motherboard and your own mother. Secondly, you wouldn’t know an Ethernet card if one came up to you in the street and shook your hand.

But that’s no reason to abandon the project and look up the phone number for your local Dell representative, because as usual, MakeUseOf has you covered. With the complete amateur in mind who has no technical knowledge whatsoever, we are going to show you how to build your own PC! This is a guide where we literally ‘hold your hand’ every step of the way.

MakeUseOf has teamed up with our very own Karl Gechlik at Ask The Admin to bring you nearly 50 pages full of screenshots, links to video demos and easy how-to instructions for every step involved. The result? The Idiot’s Guide To Building A PC. This guide is so easy to follow, even your technophobe grandmother could do it.

It’s definitely one of the better manuals out there. You can take a look at the screenshot showing the table of contents below.

In case you’re also wondering WHY you would want to build your own computer, there are a lot of reasons.

  • First of all, you should know that building a computer has become A LOT easier than it was 5 years ago. Parts are easier to install, cases are readily available and there is a crap load of free support available on the internet.
  • This is great for paranoid freaks and geeks alike!
  • By building your own machine you know each and every component of your machine
    intimately.
  • You are not affected by the Operating System bloat that companies like Dell and Gateway
    are notorious for.
  • You can also build a system that is geared towards exactly what YOU do. A computer built by you for you. Imagine that?
  • Oh and don’t forget the Geek Cred you get from having a machine you built yourself! Not so great with the ladies but hey in a room full of geeks you can get lots of ohh’s and ahhh’s!

So, download your free no strings attached manual here.

Friday, February 13, 2009

The First-Timer's Guide to Building a Computer from Scratch


If you've cracked open your PC before to install a new hard drive or TV capture card, but you've never built a whole new system from the ground up, it's not as difficult as you might think.

read more | digg story

Thursday, January 22, 2009

Contact Lens Kinda Makes You Cyborgy

This one’s kinda hard to swallow so take a deep breath, open your minds, and pretend it’s 2100. I CONTACT is essentially a mouse fitted to your eyeball. The lens is inserted like any other normal contact lens except it’s laced with sensors to track eye movement, relaying that position to a receiver connected to your computer. Theoretically that should give you full control over a mouse cursor. I’d imagine holding a blink correlates to mouse clicks.

The idea was originally created for people with disabilities but anyone could use it. Those of us too lazy to use a mouse now have a free hand to do whatever it is people do when they sit at the computer for endless hours. I love the idea but there is a caveat. How is the lens powered? Perhaps in the future, electrical power can be harnessed from the human body, just not in a Matrix creepy-like way.

Designers: Eun-Gyeong Gwon & Eun-Jae Lee

Friday, January 16, 2009

Do you make these 6 mistakes when buying a video card?

atinvidiaSince I’ve been a computer geek, I’ve heard many horror stories of people buying a slow video card, thinking that they were getting a fast model.

In general, people make the same several mistakes when they buy their video cards. Have they been with me, I’d have helped them avoid these 6 mistakes when buying a video card:

1- Buying a video card based solely on the amount of memory.

More is better, right? That’s their excuse when you have to justify your purchase to yourself or to your geek friend.

Well yes, but not if you base your purchase solely on the amount of RAM. A video card performance is based on many other factors, such as the GPU chip model, the frequency of the GPU/memory, the memory bus width, etc.

A good example of this would be someone buying a 8600GT 512MB over a 8800GT 256MB. Sure, it may have more memory, but every other factor will limit the card performance in comparison.

Also keep in mind that you won’t need the extra memory unless you play at very high resolutions, such as 1920×1080 and/or with AA/AF quality filtering. Why? Because your video card won’t need/use it.

2- Buying a lower-end new generation model over a higher-end old generation model.

It’s newer, so it must be faster!

Not so quickly. When in the majority of cases, this is true, it is not always true. So? Well, you might miss out on a really good deal, as stores tend to lower prices on older generations, to get rid of their old stock, to make space for the new stock.

Now, the mistake some of you make is to choose your card by using the generation number first. You’d think that a 4xxx card from ATI is automatically faster than a 3xxx model. If you take a Radeon 3870, it’d trash a Radeon 4350 or be faster than a Radeon 4650.

Let me quickly explain how model numbers work, using ATI’s 4850 model as an example.

4850: The first number refers to the generation of the card. A higher number there means that the video card is based on a more recent generation, which always brings in improvements over the previous generation.

4850: The second number refers to the range of that card. Same here, higher is better. In Ati’s case, for the 4xxx series, it goes mostly like this:

  • 3: Low end
  • 6: Mid range
  • 8: High performance

4850: The last two numbers refer to the place of that model, within the hierarchy of that range of video cards (See second point, for the “8″); within a generation (See first point, for the “4″). In the vast majority of cases, a higher number means higher performance, but both ATI and Nvidia tricked people in the past with crippled GS/SE models, so keep an eye open for the suffix if there’s one. No, SE does not mean special edition!!

Although ATI don’t really use suffix on their newer models, Nvidia still are. Here’s a quick reference, from slowest to fastest, when you compare two identical models otherwise:
GS

Just keep in mind that many older generation, higher-end models are often faster than some of the newer models, so make sure to google benchmarks and to compare prices!

3- Not considering the space/power requirements.

So you’ve avoided the two first mistakes, ended up buying a Geforce GTX280, are eager to play the newest games…only to realize that it doesn’t fit in your case! Good job =P

This is especially true when you have a small format case, a HTPC or if you buy a high-end video card.

Lesson here: Measure the space available for the video card in your case (Usually from the back of the case to the hard drive cage) and double-check the length of the card, which is usually found under the specs, before buying it. Check reviews and/or contact the store if you’re unsure.

You’ve bought a great card, it fits in your case, but now you’ve one or several of the following problems? :

  • Your video card needs extra power connectors and you don’t have them.
  • Your computer won’t boot.
  • Your computer boots but crashes under games.

I’m afraid that your power supply may not up to the task of powering your new video card. Now, that’s most probably it, but it might not be it, make sure to troubleshoot before buying a new power supply.

4- Teaming a powerful video card with a slow Cpu

Yay, you’ve got that new Radeon 4870X2 and you’re ready to dominate the virtual world. Only to see that you’re framerates are no where what you expected to be, according to all those reviews.

Well, if you’re using such a powerful gpu with a slow cpu, lik an Intel E4300, it just won’t work as you want it to. Your cpu will bottleneck your video card performance, which mean that it won’t be able to keep up with it and your video card performance will be reduced as it always waits on the CPU.

Simply try to keep your cpu performance in balance with your video card. If you get a midrange video card (9800 GTX, 4850) , try to team it with a midrange CPU (E7400 and such).

If you use SLI/Crossfire or even better (or worse in this case), make sure to team up your video cards with a blazing fast quad-core CPU. Most games may not benefit from quad-core yet, but the video drivers and the cards themselves will. The new Core i7 cpus are a perfect fit here.

5- Buying an overkill video card for the games that you play.

If you play is Counter-Strike 1.6, WoW or the majority of games that are 2 years or older, you probably don’t need the lastest and fastest video card.

If you play on a 17″ or 19″ screen, you probably don’t need the lastest and fastest video card.

This is just like someone who buys a Mustang simply because they want more horsepower. Could they travel to work and do their everyday activities with a Honda Civic? Most probably.

You will waste a lot of money, both on purchase, power consumption and on upgrading the rest of your system (Cpu and power supply) if you buy a video card that is overkill for your needs.

Learn to listen to your wallet, think with your head and figure out how much power you really need for the games that you play!

Now, some of you may not agree with this, as you’ll say that it’s good to have headroom for future games. I don’t think so. Why? By the time that the new game is out, your video card will still be able to handle it, perhaps at lower settings but newer video cards that offer higher performance for the same price will most probably be out by then.

I think that it is better to upgrade at a low cost every so often than to buy some of the most expensive video cards all the time. Not to mention that higher-end cards tend to devalue faster than mid-range video cards. Just like higher-end cars.

Now, if you absolutely need the fastest and most powerful video card with every new release, just to strike your ego and brag about it, go ahead, just be prepared to pay the price!

6- Listening to the recommendations of only one person.

The last, but certainly not the least of the common mistakes done when buying a video card: Listening to the opinion of a single person. What’s wrong with that?

  • The person may be a fanboy, who would recommend an inferior product from Nvidia or from ATI simply because they prefer that company.
  • The person may not have a clue of what they’re talking about. Not everyone have vast knowledge on video cards.
  • That person’s information may be outdated. After all, new video cards are released on a regular base (every couple of months, or even less)

Always make sure to get the opinion of many trusted people, ask around on forums, contact me, read plenty of reviews and comparisons. You’re going to spend a lot of your hard earned cash on that card, so make sure it is the right one for you.

Same goes for me. Don’t just listen to me, I’m human too hehehe.

Conclusion:

Buying a video card requires thoughtful thinking. With such a variety of cards available on the market, it may be confusing, so remember to avoid these mistakes, ask as many opinions as you can and shop around for good prices!

What has been your experience when buying video cards? Have you made any of the mistakes or were you going to? Do you have any tips to share with us or any mistake that I’ve not mentionned that you think we should know of? Let us know in the comments section just below!