

Monday, December 10, 2007

25 Skills Every Man Should Know: Your Ultimate DIY Guide
By The Editors of Popular Mechanics
1. Patch a Radiator Hose
Steam hissing from a ruptured radiator hose? Here's a relatively easy, temporary fix with duct tape.
Wait for the engine to cool off. Open the hood and locate the source of the steam — i.e., the rupture. Clean and dry the area around the fissure; the tape won't stick as well on a damp, dirty surface.
Wrap 2 to 3 in. of duct tape around the hose over the hole; press firmly.
Overwrap the patch (the hose will be under intense pressure) from 2 to 3 in. above the original piece to about 2 or 3 in. below, then work your way back. Check your radiator level before cranking the engine. "If it's seriously low and you don't have a can of coolant, use water or, in an emergency, diet soda," says Tony Molla of the National Institute of Automotive Service Excellence and former pro wrench jockey. "Avoid using fruit juice or anything with sugar or acids in it. It'll corrode the radiator and hoses."
2. Protect Your Computer
Viruses and spyware can unleash a host of evils upon your PC, ranging from annoying pop-ups to a zombie system takeover. Security expert John Pironti of the nonprofit security agency ISACA suggests a layered approach to safeguarding your computer.
Lock it down: "Go to the security section of your Control Panel and enable the firewall before your PC ever touches the Internet," Pironti advises. Then install a virus protection program and set it to download virus signatures every week.
Clean it up: Once a week, do a full virus scan with a program like Symantec's Norton AntiVirus (symantec.com), McAfee VirusScan (mcafee.com) or AVG Anti-Virus (free.grisoft.com). Pironti also says you should run a free spyware checker, such as SpyBot-S&D (safer-networking.org) or CCleaner (ccleaner.com).
3. Rescue a Boater Who Has Capsized
When you come upon a capsized boat, approach with caution: The cause of the accident or debris in the water could render you a victim as well. Before attempting to rescue a boater in the water, phone or radio the police or Coast Guard, then approach the victim by putting the bow into the current and the wind; swing the bow toward him and, when you get close, put the engine in neutral to minimize danger from the propellers. If the swimmer is conscious, tie a rope at the middle and stern of your boat and put it in the water; the victim can use the loop as a step. If the victim is unconscious, position him at the stern and maneuver him so he faces away from the boat, arms in the air. Grab his wrists and bob him up and down; on the third bob, use the momentum to pull him into the boat. Elevate his legs and cover him with a blanket — this will help treat him if he's in shock. Stay at the scene until help arrives.
TIP: "Don't get into the water to get someone out. If you get into the water, you put yourself at risk for hypothermia or injury. You don't want to become part of the recovery." —Executive Petty Officer Patrick Blakeley, Coast Guard Air Station, San Diego, Calif.
4. Frame a Wall
It's the basic partition — an interior, non-load-bearing wall with a door opening. Here's how to frame it, so you can divide your basement into a really useful storage area and a totally indulgent man space — say, a big-screen sports den.
Hold the base and top plates together with their ends aligned, then measure 15 1/4 in. from the end farthest from the door opening. Draw a line across the edge of the plates and mark an X right of the line. From here, mark a series of lines — one for each stud — spaced 16 in. apart, with an X to the right of each. Mark the plates to indicate a door opening.
Separate the plates and nail studs to the right of each line. Use two common 16d nails driven through the plate at the top and bottom of each stud.
Single-frame door openings require four pieces of lumber. Measure your door; then make the opening 2 in. higher and wider. To remove the sill plate in the opening, use an eight-point crosscut saw to cut almost through. (Protect the floor with masking tape.) Knock out the piece with a hammer and clean it up with a chisel.
TIP: "Each stud has a slight arch known as a crown. Position studs with crowns facing the same way when you nail the wall together. This prevents the wall from looking wavy after it's complete." —Merle Henkenius, PM contributing editor
5. Retouch Digital Photos
Some shots are too flawed to fix with a click on autocorrect. Here's how to perform surgery on digital images with nearly any photo-editing software.
Color temperature: If the color adjustment can't fix unnatural colors, such as a sickly green from fluorescent lights, and there's no time to tweak the red, green and blue levels, there's a last resort: Declare yourself an artist and switch the image's mode to black and white.
Cropping: Even a small spot of deep black or bright color can throw off a program's ability to balance an image's light or color levels. Crop out unwanted elements before making image-wide adjustments.
Lighting: Too much flash? Reduce the brightness and increase the contrast. For poorly lit images, do the opposite, boosting the brightness and reducing the contrast. To avoid gray, hazy images, make sure the photo's black elements are still black and the whites still white.
Red-eye: If your software doesn't have a red-eye-reduction feature, zoom in on the offending eyes until you can see individual pixels. Select the desaturation tool and dab at the red portion of each eye. This drains the color, turning reds into grays, while retaining highlights so the irises don't look artificial. The results probably won't be pretty, but boring gray beats demonic red.
6. Back Up a Trailer
If you're doing this without a spotter, put your left hand at six o'clock on the steering wheel, and drape your right hand over the seatback. As you back up, move your steering hand in the direction you want the trailer to go.
TIP: "If the trailer is too low to see, tape sticks or flags to the rear corners." —Mike Allen, PM senior auto editor
7. Build a Campfire
To find dry fuel, look for standing deadwood and broken branches stuck in tree limbs, says Tom Laskowski, director of Midwest Native Skills Institute. Place the material next to your cheek; if it feels cool, it's too wet to burn efficiently. To fuel a 1-hour fire, gather two large fistfuls of tinder — such as cattail down and crushed pine needles — and about 30 twigs, 20 pencil-size sticks and 10 wrist-thick pieces. Form a tepee with three 6-in.-tall sticks and place smaller sticks on the floor as a platform for the tinder. Lean the smallest sticks on the tepee, leaving a doorway to face the wind. Place the next size of sticks on top; repeat twice. Pack the tepee with the tinder and light it. Slowly add the 10 largest sticks in a star pattern.
TIP: If it's raining, Laskowski uses a cotton ball smeared with Vaseline (or ChapStick) as a foolproof fire starter.
8. Fix a Dead Outlet
If the lamp goes out, but the bulb's not fried, it's time to check the outlet. Once you turn off the breaker, here's how to fix the usual suspects.
Detached wire: Cut the damaged wire 1/8 in. from the end, strip 1/2 in. of insulation; reattach by bending the wire clockwise under the terminal screw and tighten.
Loose push-in connection: Reattach the loose wire on the back of the outlet under the appropriate terminal screw.
Loose splice: Remove the wire connector and replace it with a pro-quality Ideal 341 or 3M Super Tan. Hold the stripped wires so their ends are even and tighten the new connector.
TIP: To ensure that the splice is secure, gently tug on each wire.
9. Navigate with a Map and Compass
Though GPS may seem ubiquitous, it doesn't work everywhere. Mountains and dense tree cover can knock out sat signals — and batteries can die. Here's how to roam the backcountry with a compass and topo map.
Orient the map by aligning its magnetic north (MN) indicator with your compass's reading of MN.
Pencil the MN line across the map, then anchor the map in this north-facing position; instead of turning the map as you head toward your destination, pivot around it as if switching seats at a table.
Draw a line between where you are and where you want to go. Once you turn toward the destination, the line of travel should be perpendicular to your chest.
Fold the map parallel to your line of travel, leaving a 2-in. margin on the side that you hold. Place the map between thumb and index finger and begin "thumbing the map" — use your thumb to check off terrain features as you travel so you can look away from the map without losing your bearings.
TIP: "Estimate how long it will take to get to your destination. Then, as you pass landmarks, see if your estimate is holding up. It will give you confidence in your location. An adult male hiker takes 20 to 40 minutes per mile on flat to moderately sloping terrain." —Eric Bone, winner of multiple U.S. orienteering championships
10. Use a Torque Wrench
Using a torque wrench the wrong way leads to incorrectly tightened fasteners, which can spell trouble for your machinery. To do it right, first screw the fasteners on by hand. Some are torqued dry, some lightly oiled — check your shop manual. Next, pick a wrench — a beam-type is less expensive, but the click-type can be easier to use. To use a beam wrench, first make sure it zeros; bend the pointer if necessary. Turn the wrench steadily, holding the plastic handle so it floats on the pivot to the beam to avoid influencing the readings with your hands. With a click wrench, twist the handle until you see the desired torque in the indicator window. Tighten the wrench until you feel the mechanism click, but no farther. With both wrenches, tighten all fasteners gradually, starting in the middle of the assembly and working in a widening spiral. Begin with one-third of the final torque; return to the first fastener and tighten all to two-thirds of the final torque. Repeat, in sequence, to the final torque.
TIP: "For something like an oil pan with multiple fasteners, turn them all on two threads before finger-tightening any of them, or the last ones will be hard to start." —Mike Allen, PM senior auto editor
11. Sharpen a Knife
A knife may be the most elemental of all human tools — but only if it's sharp. Hone it the way your grandfather did, with a steady hand and a combination stone that has a coarse side and a fine side. The trick is to hold the blade at the correct angle. According to Bob Montagno, an expert sharpener and plant manager at Norton Pike (the first American sharpening-stone maker), most European blades have a 22- to 25-degree blade. "That's about the angle of a book of matches," Montagno says. "Japanese knives and fillet knives are 12 to 15 degrees."
First, lubricate the coarse side of the stone with mineral oil or water; then push the blade across in a sweeping motion, like you're cutting a thin slice off the stone. "Flip the knife and work the other side until a slight burr forms along the edge," Montagno says. "Switch to the fine side of the stone, lift the blade to a slightly higher angle and hone off the burr to create a razor-sharp micro bevel."
TIP: Stroking each side of the beveled edge at the honed angle on a steel (the rodlike tool in carving sets) straightens microscopic distortions.
12. Perform CPR
Most people have an idea of how to perform cardiopulmonary resuscitation (CPR) on a person whose heart has stopped, but you may not have taken a course in years. Here's a refresher that will help you prolong signs of life until medics arrive.
Phone for help, then look and listen for the victim's breathing. Open the airway by tilting the head back and lifting the chin so the teeth almost touch.
Pinch both nostrils closed; bend your head over his face and fully cover his mouth with yours. Give two full rescue breaths, making sure to breathe deeply.
Place your dominant hand on the middle of the victim's chest. Put your other hand on top and interlock your fingers. Straighten your arms and begin compressing the chest 1 1/2 to 2 in. with the heels of your hands. Continue the compression/breathing cycle, compressing 30 times and then breathing twice, until the person starts breathing or help arrives.
13. Fillet a Fish
Set the scene with a flat surface and an appropriate knife — any long, thin, flexible and sharp blade will do, but for larger fish you might need a stiffer blade. Make your first cut behind the pectoral fin or gill cover, angling the tip of the knife slightly toward the head.
Cut down to the spine, but not through it.
Next, turn the fish end to end and run your knife head to tail along the dorsal fin and backbone, pushing the knife deep enough to bounce the blade off the fish's rib cage.
Then run the knife carefully over the rib cage until you reach the spine. Pull the fillet back as you cut, which will help you see what you're doing.
Repeat the process through the bottom half of the fish, and you're done with that side. Flip and repeat for two boneless fish fillets.
TIP: "One side of the fish is always easier to cut than the other. It's a matter of physiology: Right-handed people find it easier to cut from left to right; lefties, vice versa. Do the harder side first. The fullness of the fish will make it easier to control on the cutting board." —John Steadman, owner and operator of Point to Point Outfitters, a charter boat service on Long Island, N.Y.
14. Maneuver a Car out of a Skid
Although there isn't much you can do when your car is pirouetting out of control, you can maneuver out of two basic types of skids before things get messy.
When the front tires slip, you're understeering or plowing. This occurs when a motorist takes a turn too fast, at too sharp an angle or uses the brake or throttle excessively. The tires lose grip and the car's momentum pushes it straight instead of through the curve. When you lose traction up front, steering has no effect; so slow down by gently reducing throttle. The tires will eventually grip and pull you in the direction you want to go.
Rear-wheel slippage is called oversteering or fishtailing. It happens during cornering when your rear wheels exceed the limit of their lateral traction before the front tires do, causing the rear of the vehicle to head toward the outside of the corner or front of the car. For rear-wheel slippage, you need to apply "CPR" — correction, pause and recovery. Correct by steering into the direction of the skid. Pause to let the unsprung weight of the car settle and the tires grip. Recover by steering the car straight; make your movements slow but sure.
TIP: "Look where you want the car to go. Stare at the pole, and you will hit the pole." —Jeff Robillard, Skip Barber Racing School, Braselton, Ga.
15. Get a Car Unstuck
When you're stuck, don't gun the engine to get out — the tires will only dig in deeper. Instead, straighten the steering wheel, then dig out as much sand, snow or mud from around the front or rear of the tires as you can, depending on the direction you want to go. Place a floor mat snugly under a portion of each drive wheel (if your vehicle is 4wd, position a mat under each wheel). Ease the vehicle onto the mats. If there's a passenger, have him push the vehicle in the direction you want to go. Repeat the procedure as needed, slowly progressing in the direction of travel until the vehicle is free.
TIP: "To maximize traction, lower the tires' air pressure by 10 to 15 psi or until the sidewall begins to bulge. This spreads out the footprint of the tire, helping the vehicle float over terrain. Drive slowly and air the tires back up as soon as possible." —Ben Stewart, PM auto editor
16. Back Up Data
Don't put off backing up your files until it's too late. Bombproof backup: Install an external hard drive the same size as your primary hard drive or larger. When your computer is new, make a drive image with a utility such as R-Drive (drive-image.com), then schedule regular backups using the external drive’s software. Multiple computers? Save money with a single network-attached storage drive, which backs up all of your PCs over the network. Online solution: If you have a small number of files, consider online storage solutions like xdrive.com and mozy.com.
17. Paint a Room
Good paint jobs start before the first can of paint is opened.
Prepare the room by removing all hardware (door latch sets, receptacle and switch plates). Don't just fill small holes in the plaster or drywall; enlarge them first so the compound can be pushed in place, and wet the hole to slow drying. Sand rough spots, wash dirty areas, then prime.
Paint the ceiling, then the walls. Use a 2 1/2-in. brush to cut in the finish color at all corners and against the trim. Switch to a roller, apply paint in a W pattern and fill it in. After you dip the roller in the paint tray, 70 percent of the paint comes off on the first downstroke; avoid splatters by starting at least 9 in. from the corner. Apply two coats.
Finish by painting the woodwork and trim with a gloss or semigloss paint. It's safest to mask off the walls beforehand, although pros often skip this step. If you do mask, use a tape designed for the purpose so the adhesive doesn't pull the paint from the wall. Once the final coat dries, reinstall hardware.
18. Mix Concrete
If you're going to use more than a cubic yard of concrete — a 9 x 9-ft. pad, 4 in. thick — call a Redi-Mix vendor. But for smaller jobs like a deck landing or fencepost footings, you can do it yourself with a hoe, shovel and wheel-barrow. Rule of thumb: A bag of portland cement makes about one-sixth of a cubic yard — or about a 44-in. square, 4 in. thick.
Mix 2 1/2 shovels of sand and 2 1/2 of gravel to each shovel of cement. (Exact proportions vary with the size of the aggregate — a.k.a. sand and gravel.)
Shovel the aggregate and cement into a wheelbarrow. Mix in water cautiously; a drier mix makes stronger concrete. When the mixture is gray/green, form a handful into a 3-in. ball. Toss it from one hand to the other. Too dry, and it will crumble; if it splatters, it's too wet. Correct the consistency with the appropriate ingredient. Don't let the concrete dry for more than an hour between loads.
Cure the poured concrete by keeping it moist for three to seven days — cover it with plastic or sprinkle water on it so the surface stays damp.
19. Clean a Bolt-Action Rifle
A. Make sure the rifle is not loaded.
B. Lay the rifle in a gun vise or cradle that will hold it securely during cleaning.
C. Remove the bolt and insert a bore guide in the action to protect it from being dinged by the cleaning rod. If the rifle has a scope, keep the scope covers on.
D. Spray foaming cleaner down the bore; let it stand for 10 to 15 minutes.
E. Screw a pointed jag that matches the rifle's caliber on the end of the cleaning rod. Soak a cloth cleaning patch in a bore cleaner or solvent, then place it on the jag. Push the patch all the way through the bore from the action end. Always clean your rifle in only one direction —from the action to the muzzle. Never scrub back and forth. When the patch exits the muzzle, unscrew it, carefully draw the rod back out and screw on a fresh patch. Repeat at least twice.
F. Attach a bore brush to the cleaning rod and push it down the barrel three times to push grime and dirt out of the rifling grooves.
G. Replace the jag and run dry patches down the bore until they come out clean.
H. Spray a cleaner/lubricant on a cloth and wipe down the bolt body, bolt face and the interior of the receiver. Before you replace the bolt, look through the barrel from the action end to be sure that it is clear of obstructions.
20. Change Oil and Filter
Every 3000 miles you can commune with your car when you change the oil. Warm the engine to stir up any sediment in the crankcase, then raise the car on stands or ramps. Put a pan under the drain and remove the plug; let it drain for 10 minutes. Remove the filter, and let it drain into the pan; make sure the O-ring comes off. Use your finger to coat the new filter's O-ring with a little oil. If the angle of the new filter allows, prefill it with oil and screw it on. Tighten a three-quarter turn after the gasket touches. Reinstall the drain plug with a new crush washer or seal. Add all but the last quart of oil, start the engine and check for leaks. Turn off the car, let it sit for a few minutes, then check the oil level. Top off to the fill mark.
21. Hook Up an HDTV
Hi-def televisions have the potential to produce some staggeringly bad images if hooked up incorrectly. In the era of digital television, resolution is quantifiable, but high-res has to be coaxed into its glory through a combination of the proper cables, components and source material. The top prize: A breathtakingly crisp 1080p (1920 x 1080 pixels) widescreen picture and multichannel sound. You can't always get picture perfection, but by following the below chart (click on image) you can hook up components the right way — ensuring that your set is squeezing the most resolution possible out of any video source.
HDTV chart
Note the TV's maximum resolution, then check the chart (click on image at right) for the maximum resolution of each source. When connecting these components to the TV, use the cable that matches the resolution you're dealing with. If your TV's resolution is less than the source's, or you're using a cable that downgrades the signal, you won't get the best picture. For example, if you have a 1080p TV, and a Blu-ray player (also 1080p), but you use a component cable to connect them, the best you'll get is 1080i. HDMI is almost always the best choice, since it handles video as well as audio. Finally, don't buy into pricey HDMI cables. The price increases for extra-long cables, but otherwise, go for the cheapest ones. Your TV won't know the difference ... because there isn't any.
22. Bleed Brakes
When the brake pedal starts to feel spongy, it's time to bleed your brakes. Make sure all four bleeder bolts at the wheels turn readily, then use a turkey baster to suck old brake fluid out of the reservoir. Clean the reservoir and fill to the brim with fresh fluid. Put a small hose on the bleeder to route the fluid into a container. Have an assistant depress the brake pedal. Open the bolt farthest away from the master cylinder a quarter-turn, then close it. Ask the helper to slowly lift his foot off the pedal, then depress it again, repeating until fresh fluid comes through the hose. Top off the reservoir regularly. Repeat the process at the other three corners, then do all four corners again. ABS pumps may require bleeding as well; check the manual.
23. Paddle a Canoe
For flat-water cruising, the sternman's J-stroke is key: It keeps the canoe tracking in a straight line. Reach forward so the "catch" — the start of the blade's pull through the water — is well in front of your knees. At midstroke, the blade should be vertical and fully immersed. The upper arm extends diagonally across your body as though delivering a cross-punch and finishes on the outside of the gunwale (top edge of the canoe). The motion delivers power through a lever action; use the shaft hand initially as a fulcrum, then pull back on the shaft. The second half of the stroke traces the hook of the letter "J." When you draw the blade out of the water, the power face (the side pulling against the water) is parallel to the canoe, with the thumb of your top hand pointing down. Your paddle is acting as a part-time rudder.
24. Fix a Bike Flat
Glass, nails, thorns — when a sharp object takes the air out of your cycling plans, here's what to do. Once you remove the wheel, force the deflated tire off the rim, starting opposite the valve, then separate tire and tube. If the leak is a large tear, throw the tube out. To locate a pinhole leak, inflate the tube and feel for escaping air. If necessary, dunk the tube in water and look for bubbles. Apply a patch from the kit you always bring along when biking. The repair should last the life of the tire. Before remounting the tire, wipe the inside of it clean with a dry cloth to remove any sharp objects that might puncture the tube. Then work the lip of the tire onto half of the rim. Tuck the tube inside the tire, and insert the valve into its rim hole. Pump some air into the tube to reduce its chances of getting pinched between rim and tire. Then work the tire onto the rest of the rim, starting at the valve. Split the wheel into quarters. Work one-quarter down either side from the valve. Then repeat the process on the other half of the tire. This final step may require two bike levers.
25. Extend Your Wireless Network
You've got a laptop that, ideally, you'd like to use anywhere in your house. But the strength of your wireless Internet fades between floors and behind thick walls. If moving the access point to the center of your home and eliminating all interior walls isn't an option, increase the range of your Wi-Fi by upgrading your equipment. Standard 802.11b and g access points can distribute a computer network to a radius of 130 to 300 ft. But you can squeeze 30 to 80 more feet of range by using an 802.11g access point with MIMO (multiple input, multiple output) technology, or up to 150 extra feet of coverage with an 802.11n access point.
If you don't want to replace your equipment, stretch the network through your electrical wiring. Powerline networking hubs (available from Netgear and Linksys) transmit your Internet connection from one outlet to any other in your house. Use them to move your access point to an ideal spot, or to set up a second hot spot for more coverage.
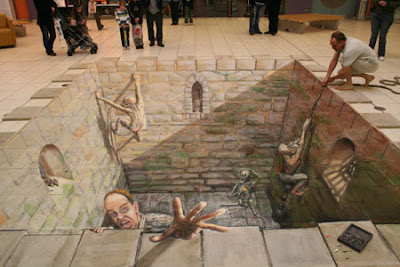
Julian Beaver's New 3D Sidewalk Paintings
December 03, 2007 by Vurdlak | Email This Post
Every now and then we post amazing set of 3D sidewalk paintings done usually by chalk artist Julian Beever. These things never get old, and always manage to fascinate. I collected dozen of photos never before seen on this site, and integrated them in this article. All look amazing to me, but I liked the "World" one the best. Is it your favorite too? If I missed any of his creations, be sure to notify me, but before you do this, check if I already posted them to the "3D Sidewalk Art" category. Another thing I noticed, is that this particular artist always poses next to his creations (when finished) in a very original way! Stay fresh my friends, and if you liked this article please share it on the net!


Subscribe to:
Posts (Atom)
 .
.

